In this article, I am going to explain steps to deploy a trained and tested Machine Learning model in production environment.
Though, this article talks about Machine Learning model, the same steps apply to Deep Learning model too.
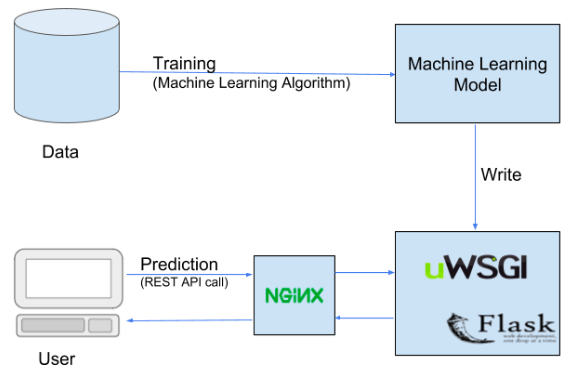
Below is a typical setup for deployment of a Machine Learning model, details of which we will be discussing in this article.

The complete code for creating a REST service for your Machine Learning model can be found at the below link:
https://github.com/cloudxlab/ml/tree/master/projects/deploy_mnist
Let us say, you have trained, fine-tuned and tested Machine Learning(ML) model – sgd_clf, which was trained and tested using SGD Classifier on MNIST dataset. And now you want to deploy it in production, so that consumers of this model could use it. What are different options you have to deploy your ML model in production?
Before you start thinking about the deployment of your ML model in production, there are a few more tasks that needs to be performed.
There may be more steps involved, depending on what specific requirements you have, but below are some of the main steps:
-
-
- Packaging your ML model
- Securing your packaged ML model
- Planning of how to serve/expose your ML model to the consumers (as a REST service, etc.)
- If you have planned for a REST service, then, creating a REST API for your ML model
- Securing your REST API
- Deploying your REST service in production (using Docker and Kubernetes)
-
Packaging your ML model
Instead of saving the ML model as it is, you can package your ML model (say mnist), and create a .pkl file for it, using Python’s joblib library.
For creating and restoring the .pkl file, you can either use joblib library or pickle library of Python. You normally use joblib to save an object having large data, else, you use pickle library. Here, in this case, we have used joblib library.
.pkl file is nothing but a serialized pickle file, which if you want, you can compress it further, to save storage space, using say Python’s gzip library. After you apply compression, your ML model file name will look like – mnist.pkl.gz
Securing your packaged ML model
The content of your pickle file (in this case your ML model) could be intercepted and modified by anyone over the network if your network is not secured. Hence, it is advisable to use secured (encrypted) network connection while exchanging the pickle file.
In addition to this, the pickle file could be signed (using ‘cryptographic signature’) before storing or transmitting, and this signature can be verified before it is restored at the receiver’s end (say your REST API). Cryptographic signature helps in detecting any alterations to your pickle file data.
Cryptographic signature uses a cryptographic algorithm which generates a cryptographic hash of your pickle file data along with shared secret key. SHA-1 cryptographic algorithm is considered to be the best algorithm to create a stronger hash, hence, it is highly advisable to use it.
Options to deploy your ML model in production
First option
One way to deploy your ML model is, simply save the trained and tested ML model (sgd_clf), with a proper relevant name (e.g. mnist), in some file location on the production machine. The consumers can read (restore) this ML model file (mnist.pkl) from this file location and start using it to make predictions on their dataset.
But, simply deploying your ML model file on the production machine may not be sufficient, as only a handful of consumers who have access to your production machine, will be able to use it.
Second option
In most of the cases, the consumers of your model may not limited to your team members, who have access to your production machine. There may be consumers, who are from different departments (and located globally) who don’t have access to your production environment. Also, if you are building the ML model to be consumed “as a service” by public (anyone), then, in that case also your consumers will not have access to your production environment.
In this case, where the consumers don’t have access to your production environment, how do you make your deployed ML model available to them?
The answer is – exposing your deployed ML model to the consumers, as a service (say REST service or REST API).
REST API increases the reach of your ML model to wider audience and as it can be called from any Application – mobile app, Java application, web application, .Net application, PHP/javascript, Python etc.
The ‘second option’ option seems to be a good option, if your audience is globally located and you want to provide this ML model as a service to a wider audience.
Hence, in this article, we will be focussing our discussion around this ‘second option’ – exposing your ML model as a REST service.
Tools and libraries to build REST API in Python
Most of the ML models are written using Python libraries now a days, hence, in this article, we will discuss about how to expose your ML model as a REST service using Python frameworks.
The most common Python framework, which is used to create a REST API in Python is, Flask.
Flask is a lightweight micro web framework written in Python, which can be used to create small web applications in Python.
Flask is not only a framework, but it also has a web server, which could be used to develop and test small Python web applications.
Flask also has APIs/functions using which you can create a REST API (service) in Python, and for testing this REST service, you can deploy in on Flask web server.
However, since, Flask is a lightweight web server, it should not be used in production environment, to deploy your web application or REST service. It should only be used in development environment, for development and testing of the web applications or REST API.
For production purposes, you can deploy this REST service (written using Python and Flask framework) on a more matured WSGI protocol compliant application server like Gunicorn or uWSGI along with Nginx as the web server.
If you are coming from Java background, then, you can think of:
-
-
- Flask framework as something like Spring or Jersey framework – to create REST API
- Nginx as like Apache Tomcat – web server
- uWSGI (or Gunicorn) as like JBoss or Websphere – application server
-

Building (and testing) your REST API (service) using Flask framework
In your ML model training Python code, you can save your trained and tested ML model (say sgd_clf), using a proper file name, on a file location of your production application server using joblib library of Python, as shown below:
# dump the model to the file
joblib.dump(sgd_clf, "trained_models/mnist_model.pkl")
Here, ML model sgd_clf is being saved with a file name mnist_model.pkl in file location ‘trained_models/’ on the production machine. This ML model you can retrieve (restore) inside your REST API code to make the predictions on the input digit images.
Below is the code in Python (using Flask framework) to create a REST API (predict_image()) which predicts a digit from a given image (containing a handwritten digit).
Currently, this REST API just takes a ‘image file name’ (‘file’) as input (sent in the request)
import numpy as np
from sklearn.externals import joblib
from PIL import Image
from flask import Flask, jsonify, request

# Create flask app
app = Flask(__name__)

# Load the previously trained model from the file
model = joblib.load("../trained_models/mnist_model.pkl")

# /predict is the end point
@app.route('/predict', methods=["POST"])
def predict_image():
    # Read the image uploaded by the curl command
    requested_img = request.files['file']

    '''
    Convert the uploaded image to grayscale.
    Since in MNIST the training images are grayscaled hence we will have to convert the uploaded image to grayscale
    '''
    grayscale_img = Image.open(requested_img).convert('L')

    '''
    Resize the uploaded image to 28x28 pixels.
    Since in MNIST the training images are of 28x28 pixels hence we will have to resize the uploaded image to 28x28 pixels.
    '''
    resized_image = grayscale_img.resize((28,28))

    # Convert the image to an array
    img = np.asarray(resized_image)

    # Reshape the image to (784, 1)
     img = img.reshape(784,)

    # Predict the digit using the trained model
    pred = model.predict(img.reshape(1, -1))

    # Get the digit
    result = int(pred.tolist()[0])

    # Return the JSON response
    return jsonify({"digit": result})
The below line of code loads (retrieves) the stored (saved) ML model mnist_model.pkl from the file location ‘../trained_models/’ using the Scikit Learn’s (sklearn) library joblib and stores it in a variable called model.
We can use this model object to make the ML predictions using its predict() function.
# Load the previously trained model from the file
model = joblib.load("../trained_models/mnist_model.pkl")
We use something called as decorators in Python (like we have annotations in Java/Spring) to modify behaviour of a function or a class.
Below, we are defining a decorator ( @app.route(…) ) for the predict_image() function, which says that any ‘POST’ request URL which matches ‘/predict’ pattern, should be redirected to this function – predict_image().
@app.route('/predict', methods=["POST"])
def predict_image():
Thus, here, we are defining the ‘End Point’ for our REST API (predict_image()). The ‘End Point URL’ for your REST API will look like as below
http://mydomain.com:8080/predictTo convert an input image to grayscale image, which is required by mnist ML model (as the model was trained on grayscale images), we can use convert() function of Image module of Python’s Pillow library.
Please don’t forget to pass value ‘L’ value to the convert() function.
grayscale_img = Image.open(requested_img).convert('L')Now, we can make predictions on this input image using the model object, using its predict() function.
# Predict the digit using the trained model
pred = model.predict(img.reshape(1, -1))
We have used Flask’s jsonify() function to convert our ‘result’ of the ML model to a JSON object. Our REST API predict_image() returns result in JSON format.
return jsonify({ “digit”: result })This JSON object (‘digit’: result), you can use to retrieve the result in your calling application.
This REST API can be called from any application – mobile app, Java application, web application, .Net application, PHP/javascript, Python, etc. The only information your consumers need about this REST API is its ‘end point URL’ and the credentials to access it.
Using a web browser to test a web service isn’t the best idea since web browsers can’t generate all types of http requests easily. Instead, use ‘curl’command of unix to test your REST API.
curl -F 'file=@test-images/7.png' 127.0.0.1:4041/predictStill some more work needs to be done, after you have created and deployed your REST API, you need to secure it. But, not all REST API functions may need to be secured.
You can use HTTP secure server (https://….) to encrypt all the communications, to make your REST service communications more secure.
You can secure your REST service using Flask extension called flask-httpauth. Using @auth.login_required decorator with your REST API functions, you can specify which functions (APIs) in the REST service are secured (protected).
You can use a ‘token’ based authentication for requests. In this type of authentication, the client application (which is calling this REST API), for the first request, sends the credentials to the REST service, and in return gets back a token, which it needs to send to the REST service in all its future requests. You can use any of the hashing algorithms (like SHA1) to create these tokens.
Also, you may get unauthorized access error thrown from these protected REST APIs (functions), which would need to be handled in the code.
In your REST API code file, you can write a separate function to handle these authorization errors. And, to specify, which function in your REST API code file, will handle these authorization errors, you can use @auth.error_handler decorator on top of such a function, as shown below:
@auth.error_handler
def unauthorized():
Here, unauthorized() is the function that will be invoked if your protected REST API function throws an unauthorized access error. You can return a relevant error message from this function as a response.
There are many other security implementations available that you can use according to the level of your security requirements. The main idea is to secure your REST API.
Achieving Scalability and Fault Tolerance for your deployed ML model
When you are creating the deployment plan for your model, you may need to consider two important aspects – Scalability and Fault Tolerance.
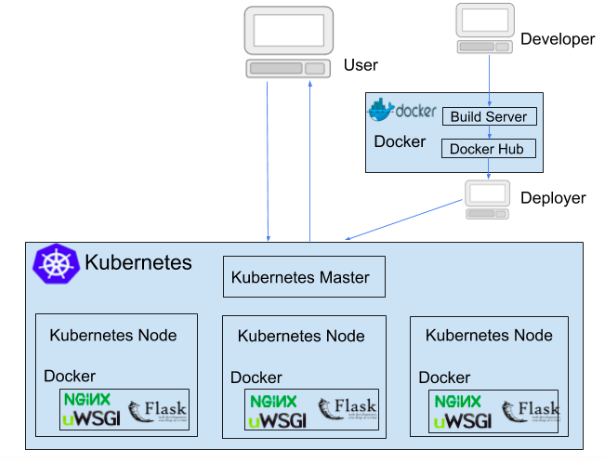
To achieve fault tolerance and scalability for your REST service, you can use Docker and Kubernetes for the deployment.
Using Docker application, you can package your REST service code/application in a Docker container. For this you need to create a Dockerfile for your REST service application (code), mentioning the following:
-
-
- the OS (operating system) requirement for your application, say CentOS 7, Ubuntu 16.04 LTS, etc.
- images of required libraries, servers like – Python, Flask, Nginx, uWSGI
- working directory of your application
- pip install command to install all the dependent libraries and packages (e.g. Flask, Pillow, etc.) for your code as listed in your requirements.txt file.
- Python command to create package file for your REST API application/code
-
You can use the above created Dockerfile to create a Docker container using ‘docker build’ command.
Now, after packaging your REST service in a Docker container, you can deploy and run your Docker containers on any machine or the VM (virtual machine).
Docker enables you to create new Docker containers (for your REST service). And Kubernetes can be used to deploy these Docker containers on a Kubernetes cluster.
Since, you can spin (create) new Docker containers on the fly (say when an existing container goes down or you need new containers due to increase in user requests), it provides you the required ‘fault tolerance’.
Kubernetes cluster (cluster of machines) provides the required ‘scalability’ for your REST service, it can spin (create) new Docker containers based on demand, using the Docker image. Kubernetes master node which also takes care of ‘fault tolerance’, if a container goes down, it spins another Docker container.
Kubernetes also has a load balancer mechanism, which takes care of distributing the load (user requests) on the containers.
Kubernetes, Spark MLLib and TensorFlow Distributed
Since, we are discussing about clusters (of machines) and Kubernetes, thought of sharing a small note on Kubernetes clusters and Spark clusters. Often, when we talk about Big Data and Spark MLLib, people get confused between Kubernetes clusters and Spark clusters. When to use which cluster?
To understand, when (and why) we use Kubernetes clusters and when we use Spark clusters, we need to understand their purpose of use.
Spark MLLib is basically a library of Spark, which has various Machine Learning algorithms (which are also available in Scikit Learn), customized to run on a Spark cluster i.e. using multiple machines. We use the ML algorithms from Spark MLLib library (in place of normal Scikit Learn version of ML algorithms), when our dataset is so huge that we need Big Data kind of processing to reduce the training and prediction time of our ML model.
For Deep Learning models, you can use TensorFlow Distributed instead of Spark MLLib.
Hence, in a nutshell, we use Spark MLLib on Spark cluster to reduce the training and prediction time of our ML model.
Whereas, we use Kubernetes cluster is used to achieve ‘scalability’, of the finally trained and tested ML model, when we deployed it on production.
When we get multiple requests simultaneously, Kubernetes spins new Docker containers (containing your ML model) and distributes the requests to the multiple containers to reduce the load.
Hence, after we have trained and tested our Spark MLLib Machine Learning model, using huge amount of data (Big Data), on a Spark cluster, we can package and deploy the same on a Kubernetes cluster in production.
But, in case, your requirement is to run Spark on a Kubernetes cluster of machines, you can do so, as Spark (version 2.3 onwards) supports this. You can create Docker containers for Spark nodes and deploy these Docker containers on Kubernetes cluster (of machines). Spark (version 2.3 and above) already comes with a Dockerfile that you can use for this purpose. For more details on this, you can refer Spark documentation.
Case Studies
Below are a few case studies for different types of deployment modes:
-
- Building a ‘You may also like it’ Amazon recommendations:
- Perform ML model training on Spark Cluster
- Perform prediction on the ML model on a scalable environment built using a mature application server and Kubernetes cluster.
- Say, on a huge database like LinkedIn, we need to find profile pictures which don’t have faces
- Train a Deep Learning Model using GPU etc.
- Run the prediction on the yarn cluster (Spark, EC2, etc.) or Kubernetes
- Build a small gadget that detects motions or tracks faces without any internet connectivity
- Train a Deep Learning Model using CPU/GPU etc. and push it to a device (e.g. mobile phone)
- Prediction on the device without any service. In this case you need to copy the model on the device itself.
- Build a small gadget that detects motions or tracks faces without any internet connectivity
- Train a Deep Learning Model using CPU/GPU etc. and push it to a device (e.g. mobile phone)
- Prediction on the device without any service. In this case you need to copy the model on the device itself.
- Build a firewall which predict the packets as malicious or not
- Train a Deep Learning Model using CPU/GPU etc. and push it to the router.
- Prediction on the router without any service. You will need to copy the model on the router for this.
- Building a ‘You may also like it’ Amazon recommendations:
Again, complete code for creating a REST service for your Machine Learning model, can be found at the below link:
https://github.com/cloudxlab/ml/tree/master/projects/deploy_mnist
For the complete course on Machine Learning, please visit Specialization Course on Machine Learning & Deep Learning