
You can run PySpark code in Jupyter notebook on CloudxLab. The following instructions cover 2.2, 2.3, 2.4 and 3.1 versions of Apache Spark.
What is Jupyter notebook?
The IPython Notebook is now known as the Jupyter Notebook. It is an interactive computational environment, in which you can combine code execution, rich text, mathematics, plots and rich media. For more details on the Jupyter Notebook, please see the Jupyter website.
Please follow below steps to access the Jupyter notebook on CloudxLab
To start python notebook, Click on “Jupyter” button under My Lab and then click on “New -> Python 3”
This code to initialize is also available in GitHub Repository here.
For accessing Spark, you have to set several environment variables and system paths. You can do that either manually or you can use a package that does all this work for you. For the latter, findspark is a suitable choice. It wraps up all these tasks in just two lines of code:
import findspark
findspark.init('/usr/spark2.4.3')
Here, we have used spark version 2.4.3. You can specify any other version too whichever you want to use. You can check the available spark versions using the following command-
!ls /usr/spark*If you choose to do the setup manually instead of using the package, then you can access different versions of Spark by following the steps below:
If you want to access Spark 2.2, use below code:
import os
import sys

os.environ["SPARK_HOME"] = "/usr/hdp/current/spark2-client"
os.environ["PYLIB"] = os.environ["SPARK_HOME"] + "/python/lib"
# In below two lines, use /usr/bin/python2.7 if you want to use Python 2
os.environ["PYSPARK_PYTHON"] = "/usr/local/anaconda/bin/python"
os.environ["PYSPARK_DRIVER_PYTHON"] = "/usr/local/anaconda/bin/python"
sys.path.insert(0, os.environ["PYLIB"] +"/py4j-0.10.4-src.zip")
sys.path.insert(0, os.environ["PYLIB"] +"/pyspark.zip")
If you plan to use 2.3 version, please use below code to initialize
import os
import sys

os.environ["SPARK_HOME"] = "/usr/spark2.3/"
os.environ["PYLIB"] = os.environ["SPARK_HOME"] + "/python/lib"
# In below two lines, use /usr/bin/python2.7 if you want to use Python 2
os.environ["PYSPARK_PYTHON"] = "/usr/local/anaconda/bin/python"
os.environ["PYSPARK_DRIVER_PYTHON"] = "/usr/local/anaconda/bin/python"
sys.path.insert(0, os.environ["PYLIB"] +"/py4j-0.10.7-src.zip")
sys.path.insert(0, os.environ["PYLIB"] +"/pyspark.zip")
If you plan to use 2.4 version, please use below code to initialize
import os
import sys

os.environ["SPARK_HOME"] = "/usr/spark2.4.3"
os.environ["PYLIB"] = os.environ["SPARK_HOME"] + "/python/lib"
# In below two lines, use /usr/bin/python2.7 if you want to use Python 2
os.environ["PYSPARK_PYTHON"] = "/usr/local/anaconda/bin/python"
os.environ["PYSPARK_DRIVER_PYTHON"] = "/usr/local/anaconda/bin/python"
sys.path.insert(0, os.environ["PYLIB"] +"/py4j-0.10.7-src.zip")
sys.path.insert(0, os.environ["PYLIB"] +"/pyspark.zip")
Now, initialize the entry points of Spark: SparkContext and SparkConf (Old Style)
from pyspark import SparkContext, SparkConf
conf = SparkConf().setAppName("appName")
sc = SparkContext(conf=conf)
Once you are successful in initializing the sc and conf, please use the below code to test
rdd = sc.textFile("/data/mr/wordcount/input/")
print(rdd.take(10))
print(sc.version)
You can initialize spark in spark2 (or dataframe) way as follows:
# Entrypoint 2.x
from pyspark.sql import SparkSession
spark = SparkSession.builder.appName("Spark SQL basic example").enableHiveSupport().getOrCreate()
sc = spark.sparkContext

# Now you even use hive
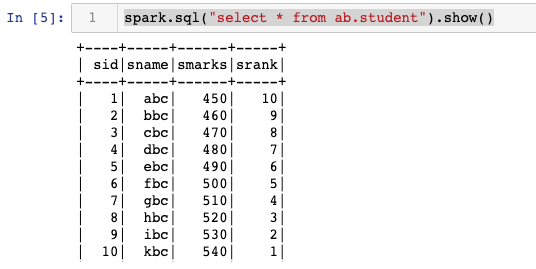
# Here we are querying the hive table student located in ab
spark.sql("select * from ab.student").show()

# it display something like this:
You can also initialize Spark 3.1 version, using the below code
import findspark
findspark.init('/usr/spark-3.1.2')
could you please let us know how to get the jdbc connection get working
I tried adding the library to SPARK-CLASSPATH instead of adding it to spark.driver.extraLibraryPath or spark.executor.extraLibraryPath
os.environ[‘SPARK_CLASSPATH’] = r”/home/sravandata002869/mysql-connector-java-5.1.40/mysql-connector-java-5.1.40-bin.jar”
Would really appreciate if you can get me a working example with jdbc connection
Thanks,
Sravan
Hi Sravan,
Just curious if above code is working from command line?
Hi Sravan,
Just curious if above code is working from command line?
Hi Sravan,
Just curious if above code is working from command line?
Hi Sravan,
Just curious if above code is working from command line?
Hi Sravan,
Just curious if above code is working from command line?
Hi Sravan,
Just curious if above code is working from command line?
I’m doing all this work on jupyter notebook
Never Mind, I got this working..
Hi Sravan,
Great!
Can you please post the solution here so that it may help other users 🙂
Thanks
i try to give my password to open jupyter notepad it’s not working even i try with token not working . message invalid password, invalid token
Hi Manish,
That is strange. Could you please share the screenshot?
To give you the complete code that I was running in the notebook
from pyspark import SparkContext,SparkConf
from pyspark.sql import SQLContext,HiveContext
sconf = SparkConf()
sc=SparkContext(conf=sconf)
sqlc=SQLContext(sc)
username = “sqoopuser”
pwd = “NHkkP876rp”
hostname = “ip-172-31-13-154”
dbname = “sqoopex”
port = 3306
table = “ani_country”
df = sqlc.read.format(“jdbc”).options(
url=”jdbc:mysql://{0}:{1}/{2}”.format(hostname, port, dbname),
driver = “com.mysql.jdbc.Driver”,
dbtable = table,
user=username,
password=pwd,
).load()
It’s not working as it cannot recognize the driver and I was not able to add the jar properly
I’ve put mysql jar in here
/home/sravandata002869
Is there a way to access Spark using scala like this ??
Hi Arun,
I think you can use the same steps for Scala also. Just make sure that you specify scala path instead of Python path.
Could you give it a try once?
Thanks
Regards,
Abhinav
HI Abhinav,
Works as charm.
Thanks you
Rgds,
Arun
Great 🙂
Regards,
Abhinav
Notebook is not launching for me in browser even if Copy/paste this URL into your browser when you connect for the first time,
to login with a token:
http://0.0.0.0:8890/?token=xxxxxxxxxxx
http://f.cloudxlab.com:8890/?token=xxxx not working . Can someone please help me
Hi @nithin_ts:disqus,
Can you please let me know what error are you getting? I hope you are replacing xxxx with the token which is generated by the command.
Hope this helps.
Thanks
I am replacing token with the generated token 🙂
This site can’t be reached
The webpage at http://0.0.0.0:8920/?token=4XXXXXXXXXXXXXXXXXX1 might be temporarily down or it may have moved permanently to a new web address.
ERR_ADDRESS_INVALID
This site can’t be reached
f.cloudxlab.com refused to connect.
Search Google for cloudxlab 8920
ERR_CONNECTION_REFUSED
I tried 3-4 open ports nothing worked
Hi, I am facing the same issue as Nithin. I am unable to launch the browser. I copied and pasted the URL and changed it to http://f.cloudxlab.com:8890/?token=xxxxxxx. The error message on the browser is “Server not found”.
Hi Sudhir,
Please make sure you are replacing the token value correctly. Here is a checklist –
1. Make sure you have specified a correct port number, in the command
2. The URL, where your notebook is running, is shown in the console, once you hit enter
3. If in case you cannot see your URL, you can see the contents of the file nohup.out using the command cat nohup.out
4. Make sure to replace the 0.0.0.0 with the domain name of your web console
5. Make sure your URL has http:// and not https:// at the beginning.
6. Also, make sure to copy the entire URL and paste it into a new browser tab
Hi Shahrukh,
I figured that this would run only on f.cloudxlab.com due to the latest version of Python.
Hi @sudhindrar:disqus,
The above steps will work in all the consoles.
I have tried this and it is not working for me , IU have been struggling to use this from past 15 days it is not resolved as well frustrating exp
Hi Singh,
I just wanted to be sure I do the right thing, I want to setup jupyter for pyspark. See instruction below if correct
Running Jupyter for pyspark
If you are going to use Jupyter for a longer duration, the connection might close causing the web console to timeout.
rm nohup.out
nohup jupyter notebook –no-browser –ip xx.cloudxlab.com –port 8890 & tail -f nohup.out &
Hi Femi,
You will not need to do that, in case you want to run jupyter for a longer duration. We have optimized our lab and updated this blog post accordingly. So you’ll be able to run jupyter for longer duration after you follow the mentioned steps. Hope it helps.
Hello,
I am new to Spark programming. I want to create an RDD in Jupyter notebook using SparkSession. Kindly suggest
If you are using Python, you can follow steps provided above.
And if you are using scala in Jupyter, the Apache toree notebook by default creates the spark object. You can use that.
why am i getting gateway time out
Please not that since spark has been upgraded the second approach “Step 2.2” now run spark 2.