
We will explore YOLO for image recognition in a series of blogs. This is the first one. In this blog, we will see how to setup YOLO with darknet and run it. We will also demonstrate the various choices you have with YOLO in terms of accuracy, speed and cost, enabling you to make a more informed choice of how you would want to run your models.
Setup Yolo with Darknet
The content in the blog is not unique. However if you are starting with YOLO, this is the first thing you need to do.
git clone https://github.com/pjreddie/darknet
cd darknet
make
It should go all fine, and you have the darknet platform installed. The next step will be to download pre-trained weights. We will download the default weights and also the optimised weights and try them.
wget https://pjreddie.com/media/files/yolov3.weights
wget https://pjreddie.com/media/files/yolov3-tiny.weights
Note that the config files for these weights are already downloaded and the in the cfg directory. We can quickly run the object detector with the default weights.
./darknet detector test cfg/coco.data cfg/yolov3.cfg yolov3.weights data/dog.jpgThis command will give a response on the terminal that looks something like this.
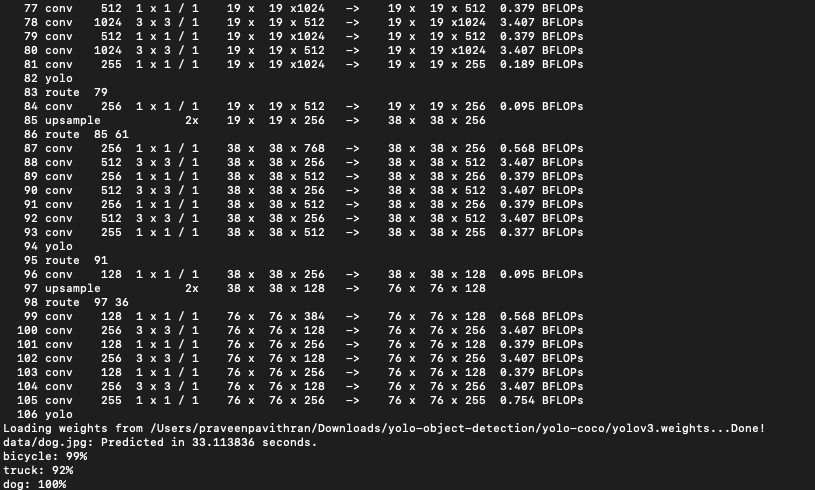
The output can be seen as a picture stored as predictions.jpg.

We can run inference on the same picture with yolo-tiny a smaller, faster but slightly less accurate model. The outputs look like these

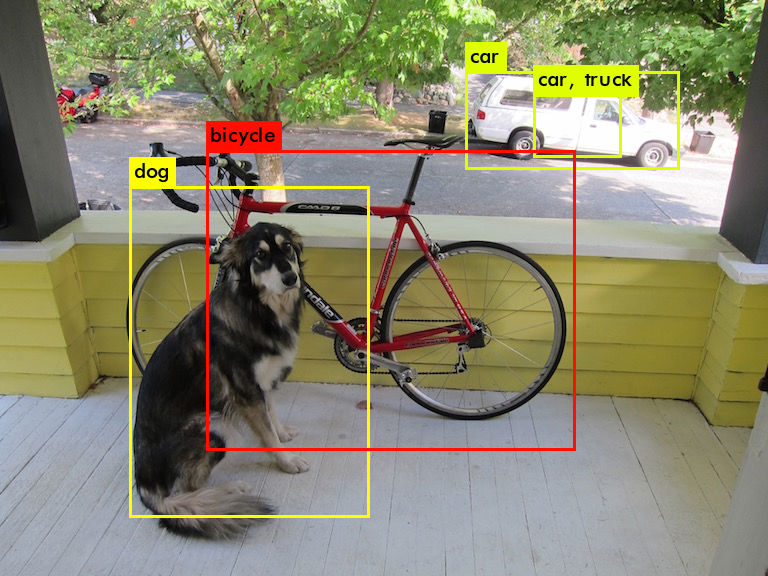
Comparing the results of yolov3 and yolo-tiny, we can see that yolo-tiny is much faster but less accurate. In this particular case it took a fraction of the time, but inferred a car/truck combo. Depending on your application you can choose a models that are faster or are more accurate.
GPU gives you Wings
You can get YOLOv3 to run a lot faster in case you have a GPU. I used a GCP vm-instance with GPU. However we have make a few changes to leverage the power of a GPU. To setup YOLO with Darknet and GPU acceleration, open the Makefile and enable GPU. Its the first line in the Makefile and run make again.
GPU=1makeYou can rerun the prediction with YOLOv3. The command line output now looks like

Comparing the speeds, we can see that GPU delivers the same results in much shorter time. So it you can afford expensive hardware like GPUs, you can be much faster and more accurate.
Using Yolov3 with different sizes
You can also choose to use Yolov3 model with a different size to make it faster. We use the same weights file, but change 2 lines in the config. Change the width and height in the config file from 608 to 320, and rerun the detect command
width=320
height=320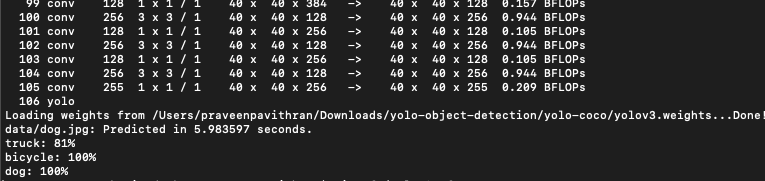
As you can see that YOLO-320 is now about 5-6 times faster than YOLO-680.
In the later segments of this series we will explore the following
- Running YOLO with python
- Running YOLO on the CCTV feed
- Label custom images for training a YOLO model
- Custom training with YOLO