This blog is part of series, where we examine practical applications of Yolo. In this blog, we will see how to setup object detection with Yolo and Python on images and video. We will also use Pydarknet a wrapper for Darknet in this blog. The impact of different configurations GPU on speed and accuracy will also be analysed.
Initial setup for YOLO with python
I presume you have already seen the first blog on YOLO. There we have run YOLO with darknet. We will need the config, weights and names files used for this blog. The files needed are
- yolov3.cfg – The standard config file used. This will be in the cfg/ directory.
- yolo-tiny.cfg – The speed optimised config file. This will be in the cfg/ directory.
- yolov3.weights – Pre-trained weights file for yolov3. This file is in the darknet/ directory.
- yolo-tiny.weights – Pre-trained speed optimised weight file. This file is in the darknet directory.
- coco.names – List of items, that the model can recognise is also in the data/ directory
- coco.data – A config data file kept in the cfg/ directory
Before we start writing the python code, we will create a environment using virtualenv
mkvirtualenv yolo-pyInstall the required libraries using pip.
pip install numpy opencv-python Object detection with YOLO, Python and OpenCV
The python code to run is below
import numpy as np
import time
import cv2
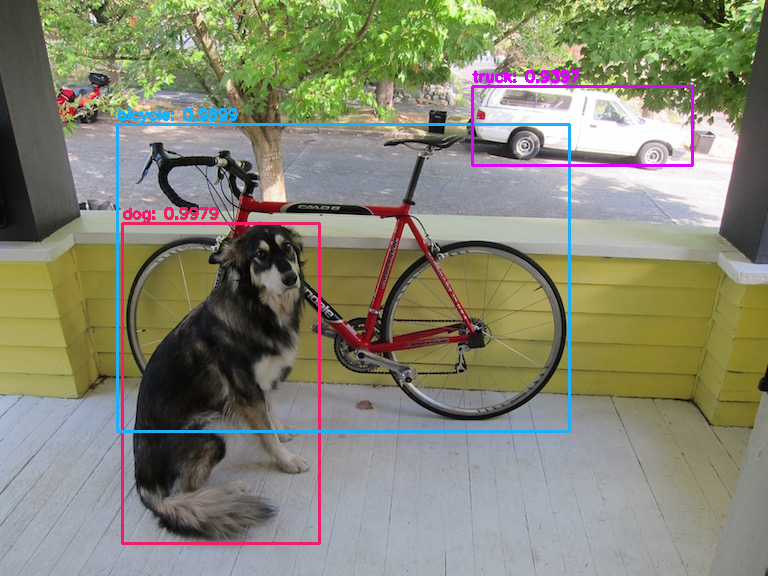
INPUT_FILE='data/dog.jpg'
OUTPUT_FILE='predicted.jpg'
LABELS_FILE='data/coco.names'
CONFIG_FILE='cfg/yolov3.cfg'
WEIGHTS_FILE='yolov3.weights'
CONFIDENCE_THRESHOLD=0.3
LABELS = open(LABELS_FILE).read().strip().split("\n")
np.random.seed(4)
COLORS = np.random.randint(0, 255, size=(len(LABELS), 3),
dtype="uint8")
net = cv2.dnn.readNetFromDarknet(CONFIG_FILE, WEIGHTS_FILE)
image = cv2.imread(INPUT_FILE)
(H, W) = image.shape[:2]
# determine only the *output* layer names that we need from YOLO
ln = net.getLayerNames()
ln = [ln[i[0] - 1] for i in net.getUnconnectedOutLayers()]
blob = cv2.dnn.blobFromImage(image, 1 / 255.0, (416, 416),
swapRB=True, crop=False)
net.setInput(blob)
start = time.time()
layerOutputs = net.forward(ln)
end = time.time()
print("[INFO] YOLO took {:.6f} seconds".format(end - start))
# initialize our lists of detected bounding boxes, confidences, and
# class IDs, respectively
boxes = []
confidences = []
classIDs = []
# loop over each of the layer outputs
for output in layerOutputs:
# loop over each of the detections
for detection in output:
# extract the class ID and confidence (i.e., probability) of
# the current object detection
scores = detection[5:]
classID = np.argmax(scores)
confidence = scores[classID]
# filter out weak predictions by ensuring the detected
# probability is greater than the minimum probability
if confidence > CONFIDENCE_THRESHOLD:
# scale the bounding box coordinates back relative to the
# size of the image, keeping in mind that YOLO actually
# returns the center (x, y)-coordinates of the bounding
# box followed by the boxes' width and height
box = detection[0:4] * np.array([W, H, W, H])
(centerX, centerY, width, height) = box.astype("int")
# use the center (x, y)-coordinates to derive the top and
# and left corner of the bounding box
x = int(centerX - (width / 2))
y = int(centerY - (height / 2))
# update our list of bounding box coordinates, confidences,
# and class IDs
boxes.append([x, y, int(width), int(height)])
confidences.append(float(confidence))
classIDs.append(classID)
# apply non-maxima suppression to suppress weak, overlapping bounding
# boxes
idxs = cv2.dnn.NMSBoxes(boxes, confidences, CONFIDENCE_THRESHOLD,
CONFIDENCE_THRESHOLD)
# ensure at least one detection exists
if len(idxs) > 0:
# loop over the indexes we are keeping
for i in idxs.flatten():
# extract the bounding box coordinates
(x, y) = (boxes[i][0], boxes[i][1])
(w, h) = (boxes[i][2], boxes[i][3])
color = [int(c) for c in COLORS[classIDs[i]]]
cv2.rectangle(image, (x, y), (x + w, y + h), color, 2)
text = "{}: {:.4f}".format(LABELS[classIDs[i]], confidences[i])
cv2.putText(image, text, (x, y - 5), cv2.FONT_HERSHEY_SIMPLEX,
0.5, color, 2)
# show the output image
cv2.imwrite("example.png", image)
Yolo with Video
Now that we know how to work with images, we can easily extend this to work with video. The code is mostly the same. We will read the video in a loop and treat each frame as an image. We will also measure the frames per second (FPS), to check speed of the model. First install the imutils package which will be used in this segment.
pip install imutilsWe need input videos to analyse. I used a Youtube Downloader to download this video. Feel free to us any thing you like. I am a bit biased toward traffic videos. Video processing can be very time consuming. In case you want stop the processing midway, press the key ‘q’ (line 123). The code will stop processing midway and you can review the partial results.
import numpy as np
import time
import cv2
import imutils
from imutils.video import FPS
from imutils.video import VideoStream


INPUT_FILE='traffic_1.mp4'
OUTPUT_FILE='output.avi'
LABELS_FILE='data/coco.names'
CONFIG_FILE='cfg/yolov3.cfg'
WEIGHTS_FILE='yolov3.weights'
CONFIDENCE_THRESHOLD=0.3

H=None
W=None

fps = FPS().start()

fourcc = cv2.VideoWriter_fourcc(*"MJPG")
writer = cv2.VideoWriter(OUTPUT_FILE, fourcc, 30,
	(800, 600), True)

LABELS = open(LABELS_FILE).read().strip().split("\n")

np.random.seed(4)
COLORS = np.random.randint(0, 255, size=(len(LABELS), 3),
	dtype="uint8")


net = cv2.dnn.readNetFromDarknet(CONFIG_FILE, WEIGHTS_FILE)

vs = cv2.VideoCapture(INPUT_FILE)


# determine only the *output* layer names that we need from YOLO
ln = net.getLayerNames()
ln = [ln[i[0] - 1] for i in net.getUnconnectedOutLayers()]
cnt =0;
while True:
	cnt+=1
	print ("Frame number", cnt)
	try:
		(grabbed, image) = vs.read()
	except:
		break
	blob = cv2.dnn.blobFromImage(image, 1 / 255.0, (416, 416),
		swapRB=True, crop=False)
	net.setInput(blob)
	if W is None or H is None:
		(H, W) = image.shape[:2]
	layerOutputs = net.forward(ln)


	# initialize our lists of detected bounding boxes, confidences, and
	# class IDs, respectively
	boxes = []
	confidences = []
	classIDs = []

	# loop over each of the layer outputs
	for output in layerOutputs:
		# loop over each of the detections
		for detection in output:
			# extract the class ID and confidence (i.e., probability) of
			# the current object detection
			scores = detection[5:]
			classID = np.argmax(scores)
			confidence = scores[classID]

			# filter out weak predictions by ensuring the detected
			# probability is greater than the minimum probability
			if confidence > CONFIDENCE_THRESHOLD:
				# scale the bounding box coordinates back relative to the
				# size of the image, keeping in mind that YOLO actually
				# returns the center (x, y)-coordinates of the bounding
				# box followed by the boxes' width and height
				box = detection[0:4] * np.array([W, H, W, H])
				(centerX, centerY, width, height) = box.astype("int")

				# use the center (x, y)-coordinates to derive the top and
				# and left corner of the bounding box
				x = int(centerX - (width / 2))
				y = int(centerY - (height / 2))

				# update our list of bounding box coordinates, confidences,
				# and class IDs
				boxes.append([x, y, int(width), int(height)])
				confidences.append(float(confidence))
				classIDs.append(classID)

	# apply non-maxima suppression to suppress weak, overlapping bounding
	# boxes
	idxs = cv2.dnn.NMSBoxes(boxes, confidences, CONFIDENCE_THRESHOLD,
		CONFIDENCE_THRESHOLD)

	# ensure at least one detection exists
	if len(idxs) > 0:
		# loop over the indexes we are keeping
		for i in idxs.flatten():
			# extract the bounding box coordinates
			(x, y) = (boxes[i][0], boxes[i][1])
			(w, h) = (boxes[i][2], boxes[i][3])

			color = [int(c) for c in COLORS[classIDs[i]]]

			cv2.rectangle(image, (x, y), (x + w, y + h), color, 2)
			text = "{}: {:.4f}".format(LABELS[classIDs[i]], confidences[i])
			cv2.putText(image, text, (x, y - 5), cv2.FONT_HERSHEY_SIMPLEX,
				0.5, color, 2)

	# show the output image
	cv2.imshow("output", cv2.resize(image,(800, 600)))
	writer.write(cv2.resize(image,(800, 600)))
	fps.update()
	key = cv2.waitKey(1) & 0xFF
	if key == ord("q"):
		break

fps.stop()

print("[INFO] elasped time: {:.2f}".format(fps.elapsed()))
print("[INFO] approx. FPS: {:.2f}".format(fps.fps()))

# do a bit of cleanup
cv2.destroyAllWindows()

# release the file pointers
print("[INFO] cleaning up...")
writer.release()
vs.release()
The output of this video can be found here.
Video Analytics with Pydarknet
Pydarknet is a python wrapper on top of the Darknet model. I would strongly recommend this as it easier to use and can also be used with a GPU for HW acceleration.
pip3 install numpy
pip3 install yolo34py
#GPU version
pip3 install yolo34py-gpu
The code that uses the package is below. I have also included comments in each section explaining what each component does.
from pydarknet import Detector, Image
import cv2
import numpy as np
import imutils
from imutils.video import FPS
from imutils.video import VideoStream


#Files used in the program. Make changes for input, config, weights etc
INPUT_FILE='traffic_1.mp4'
OUTPUT_FILE='output.avi'
LABELS_FILE='data/coco.names'
CONFIG_FILE='cfg/yolov3.cfg'
WEIGHTS_FILE='yolov3.weights'
DATA_FILE="cfg/coco.data"
CONFIDENCE_THRESHOLD=0.3


#FPS calculator enables
fps = FPS().start()

#Declaration of output file to save the analysed video
fourcc = cv2.VideoWriter_fourcc(*"MJPG")
writer = cv2.VideoWriter(OUTPUT_FILE, fourcc, 30,
	(800, 600), True)

#Read all labels
LABELS = open(LABELS_FILE).read().strip().split("\n")
np.random.seed(4)
COLORS = np.random.randint(0, 255, size=(len(LABELS), 3),
	dtype="uint8")
#Create a dictionary with different colors for each class of labels
COLOR_LABEL={}
for i in range(0, len(LABELS)):
    COLOR_LABEL[LABELS[i]]=COLORS[i]

#Read the YOLO files
net = Detector(bytes(CONFIG_FILE, encoding="utf-8"), bytes(WEIGHTS_FILE, encoding="utf-8"), 0, bytes(DATA_FILE,encoding="utf-8"))

#Setting the video reader
vs = cv2.VideoCapture(INPUT_FILE)
cnt=0


#We have set a limit of 500 frames. This can be changed
while True and cnt < 500:
    cnt+=1
    print ("Frame number", cnt)
    try:
        (grabbed, image) = vs.read()
    except:
        break

    img_darknet = Image(image)

    #Run detection on each frame

    results = net.detect(img_darknet)

    #make bounding boxes and text for each image
    for cat, score, bounds in results:

        x, y, w, h = bounds
        color = [int(c) for c in COLOR_LABEL[str(cat.decode("utf-8"))]]
        text = "{}: {:.4f}".format(str(cat.decode("utf-8")), score)
        cv2.rectangle(img, (int(x - w / 2), int(y - h / 2)), (int(x + w / 2), int(y + h / 2)), color, thickness=2)

        cv2.putText(img,text,(int(x - w/2),int(y -h/2 -5)),cv2.FONT_HERSHEY_COMPLEX,1,color)


    #write frame to output file
    writer.write(cv2.resize(image,(800, 600)))
    fps.update()

fps.stop()

print("[INFO] elasped time: {:.2f}".format(fps.elapsed()))
print("[INFO] approx. FPS: {:.2f}".format(fps.fps()))

# do a bit of cleanup
cv2.destroyAllWindows()

# release the file pointers
print("[INFO] cleaning up...")
writer.release()
vs.release()
Speed of video processing
I then analysed the same video with different model configuration and hardware. For using yolov3-tiny, change the config and weights files paths. To change the size of the YOLOv3 model, open the config file and change height and width parameters. I have tested it with 608 (default), 416 and 320. For the GPU, I used a GCP compute instance with 1 NVIDA K10 GPU. The FPS from the different runs can be found in the table below.
| No | Type | FPS (GPU) | FPS(CPU) |
| 1 | YOLOv3-608 | 4.15 | 0.03 |
| 2 | YOLOv3-416 | 4.83 | 0.05 |
| 3 | YOLOv3-320 | 5.75 | 0.14 |
| 4 | YOLOv3-tiny | 8.67 | 0.59 |
A smaller model can get faster at the expense of accuracy. The gains from a smaller model are much more important if you are running on non-GPU hardware. If you have access to a large GPU, the bigger model is better.
In the other segments of this series we will explore the following
- Running YOLO with Darknet
- Running YOLO on the CCTV feed
- Label custom images for training a YOLO model
- Custom training with YOLO