A few months back, I had presented results of my experiments with Fashion-MNIST using Machine Learning algorithms which you can find in the below mentioned blog:
https://cloudxlab.com/blog/fashion-mnist-using-machine-learning/
In the current article, I am presenting the results of my experiments with Fashion-MNIST using Deep Learning (Convolutional Neural Network – CNN) which I have implemented using TensorFlow Keras APIs (version 2.1.6-tf).
The complete code for this project you can find here :
https://github.com/cloudxlab/ml/tree/master/projects/Fashion-MNIST
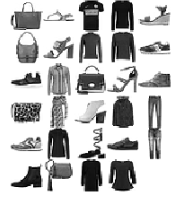
Fashion-MNIST is a dataset of Zalando’s fashion article images —consisting of a training set of 60,000 examples and a test set of 10,000 examples. Each instance is a 28×28 grayscale image, associated with a label.
Objective
This work is part of my experiments with Fashion-MNIST dataset using Convolutional Neural Network (CNN) which I have implemented using TensorFlow Keras APIs(version 2.1.6-tf). The objective is to identify (predict) different fashion products from the given images using a CNN model. For regularization, I have used ‘dropout’ technique for this problem.
Acknowledgements
I have used Fashion-MNIST dataset for this experiment with Deep Learning. Fashion-MNIST dataset is a collection of fashion articles images provided by Zalando . Thanks to Zalando Research for hosting the dataset.
Understanding and Analysing the dataset
Fashion MNIST Training dataset consists of 60,000 images and each image has 784 features (i.e. 28×28 pixels). Each pixel is a value from 0 to 255, describing the pixel intensity. 0 for white and 255 for black.
The class labels for Fashion MNIST are:
| Label | Description |
| 0 | T-shirt/top |
| 1 | Trouser |
| 2 | Pullover |
| 3 | Dress |
| 4 | Coat |
| 5 | Sandal |
| 6 | Shirt |
| 7 | Sneaker |
| 8 | Bag |
| 9 | Ankle boot |
Let us have a look at one instance (an article image), say at index 220, of the training dataset.
plt.figure()
plt.imshow(np.squeeze(train_images[220]))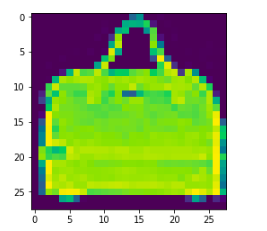
train_labels[220]
8
So, we see that image at index (instance no.) 220 is a bag, and the corresponding label value also indicates the same (8 – Bag).
Problem Definition
The ‘target’ dataset has 10 class labels, as we can see from above (0 – T-shirt/top, 1 – Trouser,,….9 – Ankle Boot).
Given the images of the articles, we need to classify them into one of these classes, hence, it is essentially a ‘Multi-class Classification’ problem.
We will be using CNN to come up with a model for this problem and will use “Accuracy” as the performance measure.
Preparing the Data
We already have the splitted dataset (training and test) available in ratio 85:15 (60,000:10,000) from Zalando Research, we will use the same for this experiment.
fashion_mnist = keras.datasets.fashion_mnist

(train_images, train_labels), (test_images, test_labels) = fashion_mnist.load_data()

train_images.shape

(60000, 28, 28)

train_labels.shape

(60000,)

test_images.shape

(10000, 28, 28)

test_labels.shape

(10000,)
As part of data preparation, following techniques were applied on the dataset:
-
- Shuffling
- Normalization
We shuffle the training dataset to get uniform samples for cross-validation. This also ensures that we don’t miss out any digit in a cross-validation fold.
Each image (instance) in the dataset has 784 pixels (features) and value of each feature(pixel) ranges from 0 to 255, this range is too wide, hence we have performed Normalization on the training and test dataset, by dividing the pixels by 255, so that values of all features (pixels) are in a small range (0 to 1).
train_images_norm = train_images / 255.0
test_images_norm = test_images / 255.0
CNN Model Architecture
Below is the architecture of my final CNN model. It has 3 convolutional layers, 2 max. Pool layers, 2 dropout layers, 1 fully connected (dense) layer and 1 output (softmax) layer. Apart from these, it also has a flatten layer whose purpose is just to ‘flatten’ the output, i.e. convert a 2-D output to a 1-D output (which is then fed to the dense layer).
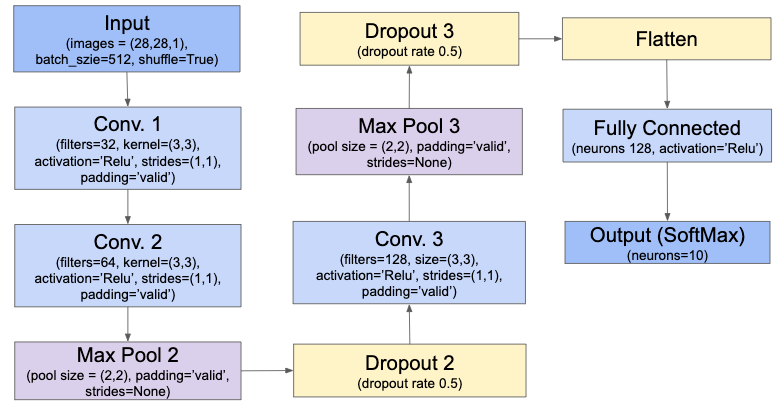
new_model = models.Sequential()

new_model.add(conv1)

# No Pooling Layer and Dropout layer for first Convolutional layer 'conv1'

new_model.add(conv2)
new_model.add(max_pool_2)
new_model.add(drop_2)
new_model.add(conv3)
new_model.add(max_pool_3)
new_model.add(drop_3)
new_model.add(flat_layer)
new_model.add(fc)
new_model.add(output)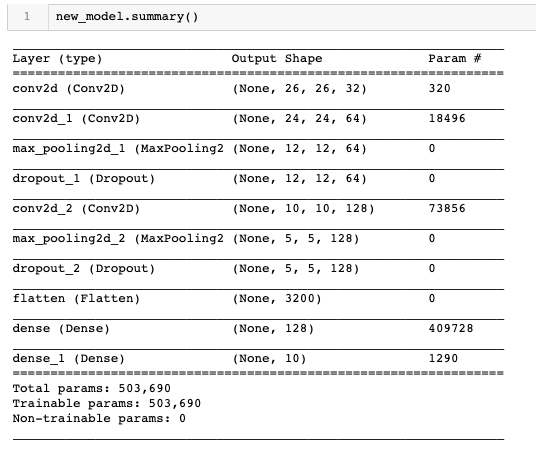
Training, Validation and Test Results
During the training phase itself the cross validation (validation dataset = 10% of training dataset) and hyperparameter tuning were performed on the training dataset.
First, I tried with a CNN model without any regularization technique applied to it, below table shows the results of training and cross validation (validation) for the same.
Deep learning models have a high tendency to overfit (perform well on training dataset than on the validation/test dataset), the same can be seen in the below results.
Results of CNN model without applying Regularization
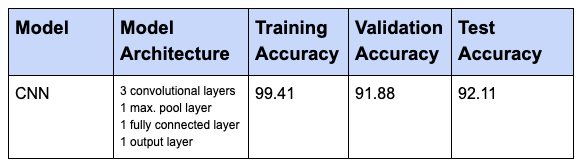
A training accuracy of 99% and test accuracy of 92% confirms that model is overfitting.
To solve the model overfitting issue, I applied regularization technique called ‘Dropout’ and also introduced a few more max. pool layers. The architecture diagram for this CNN model is shown above (under section – CNN Model Architecture). Below are the results for the same.
Results of the CNN model with regularization (dropout) applied
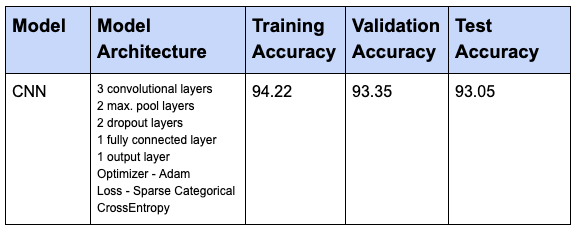
A training accuracy value of 94% and test accuracy of 93% confirms that model is performing fine and there is no overfitting. Thus, this is our final CNN model.
Please note that ‘Dropout’ should only be applied during the training phase and not during the test phase. For the test phase, TensorFlow Keras API (evaluate() method) automatically takes care of this internally, we needn’t specify any parameter for this (to not apply Dropout).
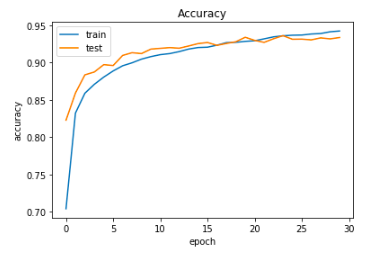
Below are the plots for ‘Accuracy’ and ‘Loss’ for training and validation(test) phases for this final CNN model.

Let us make a prediction for one of the instances/images (say instance no. 88) using our final CNN model (new_model).
# Making predictions on Test dataset

predicted_test_labels = new_model.predict(test_images_norm)

predicted_test_labels.shape

(10000, 10)

predicted_test_labels[88]

array([9.9878651e-01, 1.5129776e-09, 1.0235499e-04, 1.5311174e-05, 6.6746189e-08, 5.6005112e-10, 1.0947105e-03, 1.0985579e-12,
9.4132378e-07, 1.5505348e-10], dtype=float32)

predicted_test_labels_index = np.argmax(predicted_test_labels[88])

predicted_test_labels_index

0

test_labels[88]

0

plt.figure()

plt.imshow(np.squeeze(test_images[88]))
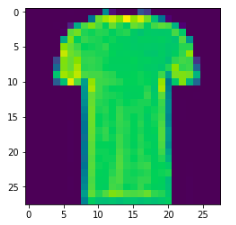
Thus, we see that, our CNN model has predicted it right, actual instance (image) at instance no. 88 is a T-shirt and our predicted value also confirms the same (test labels[88] = 0; test_images[88] – T-shirt).
Conclusion
With our final CNN model, we could achieve a training accuracy of 94% and test accuracy of 93% confirming that model is fine with no overfitting.
If you remember, with Machine Learning model (XGBoost) I had achieved a test accuracy of 84.72 %, and with Deep Learning model (CNN) here I could achieve a test accuracy of 93 %. Thus, we got around 8% improvement in accuracy by using Deep Learning.
Though, in this case, we got a good improvement in accuracy score (8%), still there may be a chance to improve performance further, by say, increasing the number of convolutional layers (and neurons/filters) or trying out different combinations of different layers.
The complete code for this project you can find here : https://github.com/cloudxlab/ml/tree/master/projects/Fashion-MNIST
For the complete course on Machine Learning, please visit Specialization Course on Machine Learning & Deep Learning