SQL is a very important skill. You not only can access the relational databases but also big data using Hive, Spark-SQL etcetera. Learning SQL could help you excel in various roles such as Business Analytics, Web Developer, Mobile Developer, Data Engineer, Data Scientist, and Data Analyst. Therefore having access to SQL client is very important via browser. In this blog, we are going to walk through the examples of interacting with SQLite and MySQL using Jupyter notebook.
A Jupyter notebook is a great tool for analytics and interactive computing. You can interact with various tools such as Python, Linux, File System, Scala, Lua, Spark, R, and SQL from the comfort of the browser. For almost every interactive tool, there is a kernel in Jupyter. Let us walk through how would you use SQL to interact with various databases from the comfort of your browser.
Installation
The kernel that we are going to use is ipython-sql. If you are using CloudxLab environment, you don’t need to install anything. You can just open “Python 3” notebook and start with rest.
If you are not using CloudxLab, you will have to install ipython-sql using the following command:
pip install ipython-sql
Now, create a new notebook using Jupyter, New -> "Python 3" on CloudxLab.
Load Extension
The first thing you need to do is load the extension. Run the following command in the Jupyter notebook:
%load_ext sql
Interact with SQLite
SQLite is a great light database. From their website, this description is very precise:
The SQLite file format is stable, cross-platform, and backward compatible and the developers pledge to keep it that way through the year 2050. SQLite database files are commonly used as containers to transfer rich content between systems [1][2][3] and as a long-term archival format for data [4].
www.sqlite.org
Initialize connection
Once you have loaded the sql extension, you can interact with it after initializing connection to. If you are on your own Jupyter installation not on CloudxLab, you will have to install SQLite and it’s driver. On CloudxLab, you can simply connect to an SQLite database using the following command.
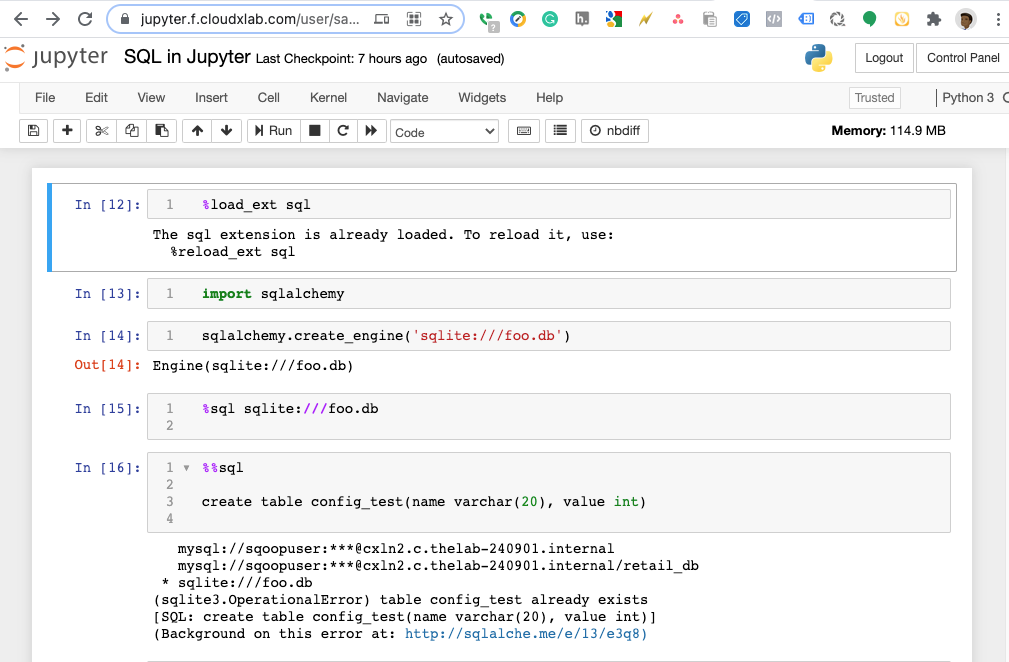
%sql sqlite:///foo.db
It will create a database file with the name foo.db in your home directory, it is not existing already else it will simply initialize the connection to existing database.
Create Table in SQLite
Let’s create a simple table `config_test` with two columns – name and value.
 %%sql
 create table config_test(name varchar(20), value int)
Please note the ‘%’ twice before ‘sql’. Earlier we using only a single ‘%’.
Insert data into a table in SQLite
We can insert the data into the table previously created using standard SQL commands.
%%sql
insert into config_test values("sandeep", 20);
insert into config_test values("sandeep", 30);
insert into config_test values("giri", 10)
In an SQL cell in the Jupyter notebook, you can add multiple SQL statements. Please make sure to end each statement with a semicolon. Though you can skip the semicolon on the last statement of the cell.
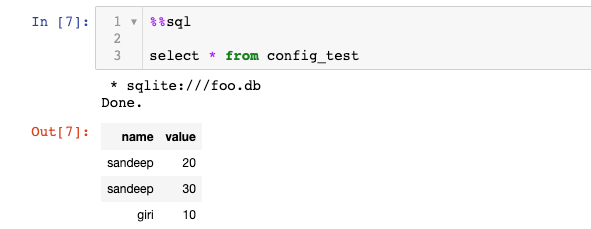
Querying SQLite table
Of course, you can query using complex SQL in SQLite. The select statement would also require you to start the cell with %%sql.
%%sql
select * from config_test
You can write any complex query in the cell. It would display the results in the following format.
Here is another example of the query.
%%sql
 select name, sum(value), count(value) from config_test group by name
It basically groups the data by name and aggregates the value.
To help you practice SQL, we have updated an SQLite DB to a shared location. We have copied the database file from here. You can use that database with the following command.
%sql sqlite:////cxldata/sqlite/sf-food-inspections-lives.sqlitePlease note that there are four slashes after “sqlite:” in the Url. The first three slashes are part of the URL scheme and the last slash is for the absolute path because the database file sf-food-inspections-lives.sqlite is located in the folder /cxldata/sqlite.
To find out which tables are there in this database, you can use the following command. The standard command “.tables” from the SQLite console will not work.
%%sql
 SELECT name FROM sqlite_master WHERE type='table'
This would print inspection_records.
Now, you can practice querying this table. Here is a simple query:
%%sql
select * from inspection_records limit 10;
Interact with MySQL using Jupyter notebook
Establish connection
In CloudxLab, we already have an installed MySQL database. The details of which you can find in My Lab -> SQL Credentials
If you are doing it on your local machine, you might have to install MySQL database and the mysql driver in Jupyter notebook.
The first thing you have to do is initialize a connection:
%sql mysql://sqoopuser:NHkkP876rp@cxln2.c.thelab-240901.internal/retail_dbBasically, the formal of connection URL is mysql://login:password@host/databasename
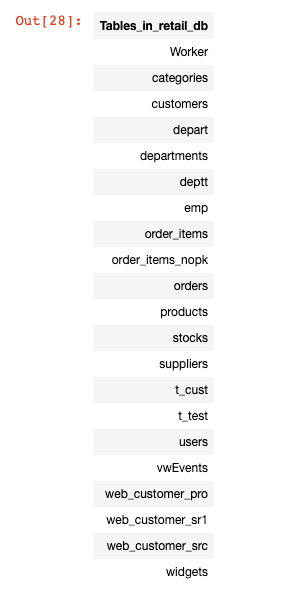
Querying MySQL
Now, you can run any SQL query just like mentioned above. To find out about tables, you can run:
%%sql
 show tables
It would display something like this:
To see what’s there in `customers` table, you can use:
%%sql
 select * from customers limit 10;
You can interact with other databases in a similar fashion. You will have to use different connection strings. Please take a look at its documentation for more details.
To learn SQL, you can follow this SQL Tutorial.
Happy Learning!