
It is really a great site. As a 37-year-old with a masters
in mechanical engineering, I decided to switch careers
and get another masters. One of my courses was
Big Data and, at the beginning, I was completely lost
& I was falling behind in my assignments and after
searching the internet for a solution, finally found CloudxLab.Not only do they have any conceivable Big Data
technology on their servers, they have superb
customer support. Whenever I have had a doubt,
even in debugging my own programs, they have
answered me with the correct solution in a few hours.I earnestly recommend it to everyone.
Building Real-Time Analytics Dashboard Using Apache Spark
In this blog post, we will learn how to build a real-time analytics dashboard using Apache Spark streaming, Kafka, Node.js, Socket.IO and Highcharts.
Complete Spark Streaming topic on CloudxLab to refresh your Spark Streaming and Kafka concepts to get most out of this guide.
Problem Statement
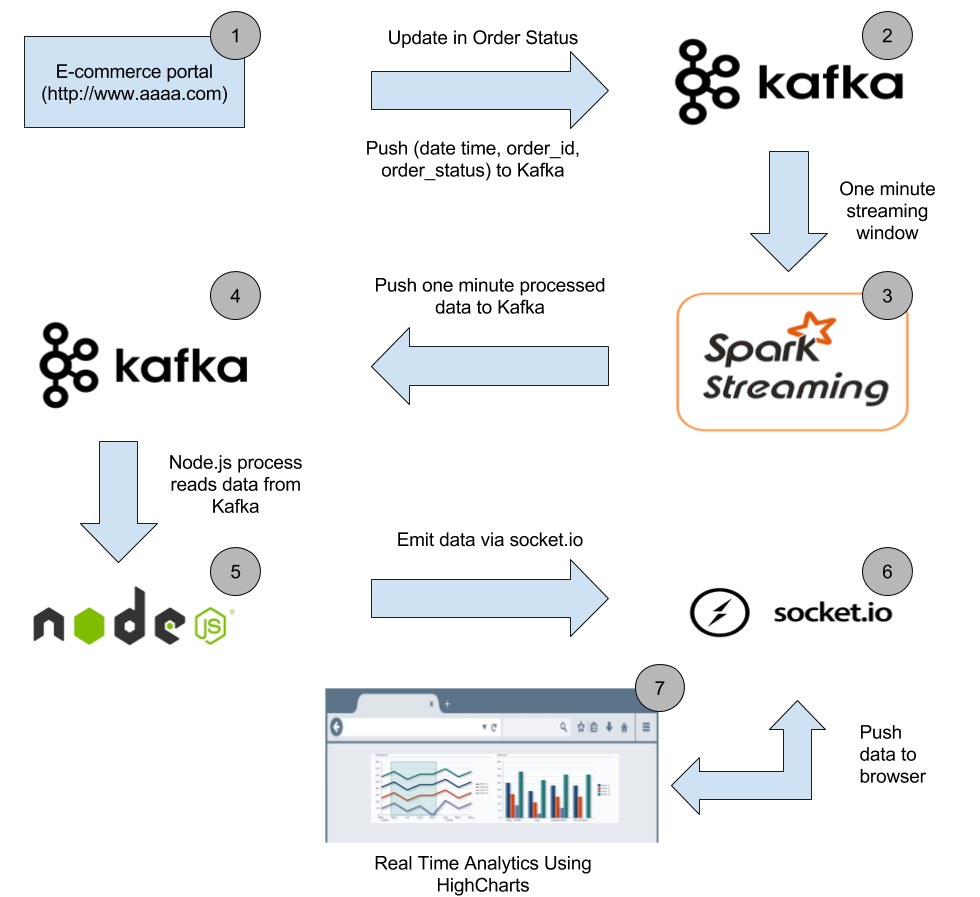
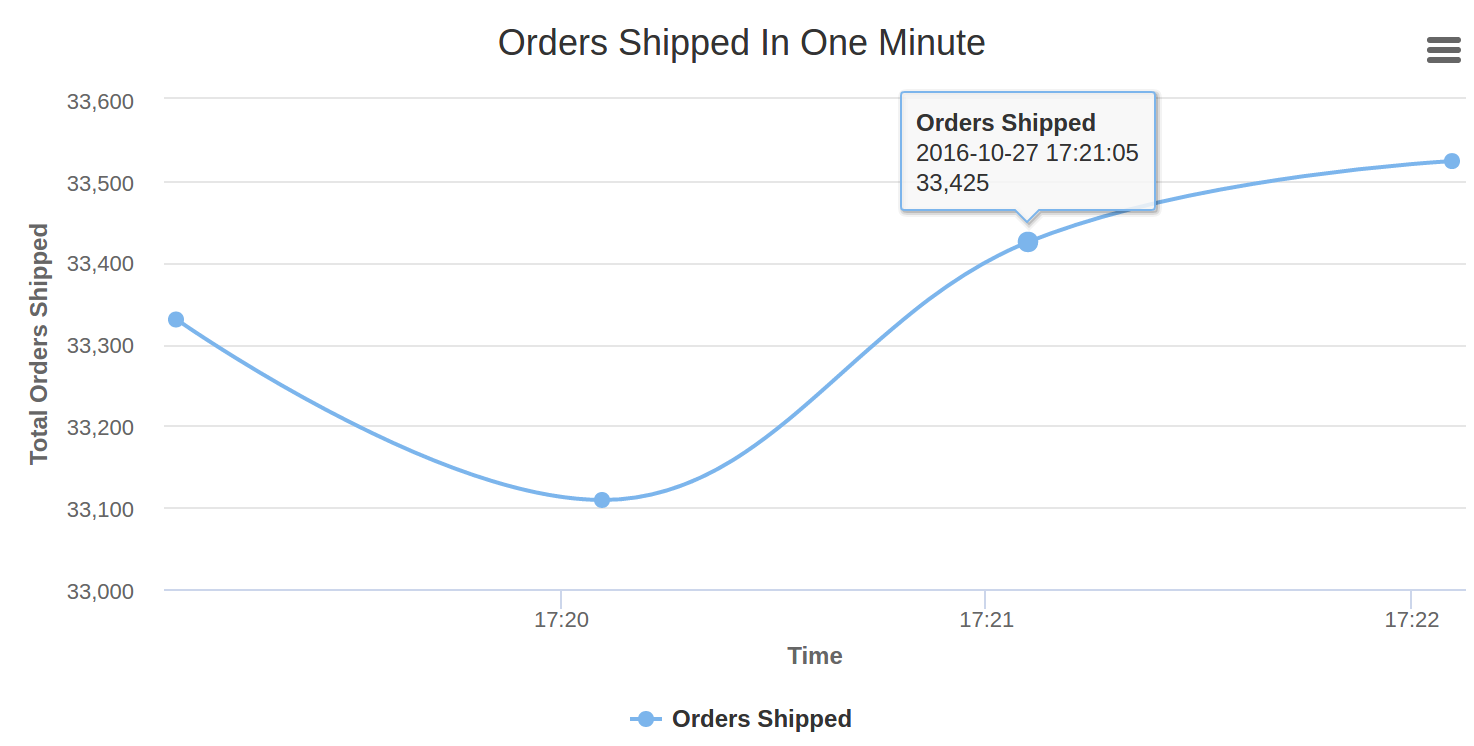
An e-commerce portal (http://www.aaaa.com) wants to build a real-time analytics dashboard to visualize the number of orders getting shipped every minute to improve the performance of their logistics.
Solution
Before working on the solution, let’s take a quick look at all the tools we will be using:
Apache Spark – A fast and general engine for large-scale data processing. It is 100 times faster than Hadoop MapReduce in memory and 10x faster on disk. Learn more about Apache Spark here
Python – Python is a widely used high-level, general-purpose, interpreted, dynamic programming language. Learn more about Python here
Kafka – A high-throughput, distributed, publish-subscribe messaging system. Learn more about Kafka here
Node.js – Event-driven I/O server-side JavaScript environment based on V8. Learn more about Node.js here
Socket.IO – Socket.IO is a JavaScript library for real-time web applications. It enables real-time, bi-directional communication between web clients and servers. Read more about Socket.IO here
Highcharts – Interactive JavaScript charts for web pages. Read more about Highcharts here
CloudxLab – Provides a real cloud-based environment for practicing and learn various tools. You can start practicing right away by just signing up online.
How To Build A Data Pipeline?
Below is the high-level architecture of the data pipeline
Our real-time analytics dashboard will look like this
Continue reading “Building Real-Time Analytics Dashboard Using Apache Spark”
Cloudera Certification Practice On CloudxLab
How does CloudxLab help with preparing for Cloudera, Hortonworks, and related certifications? Here is an interview with one of our users who
has successfully completed the ‘Cloudera Certified Associate for Spark and Hadoop Developer‘ (CCA175) certification using CloudxLab for hands-on practice. Having completed the certification, Senthil Ramesh who is currently working with Accenture, gladly discussed his experience with us.
CxL: How did CloudxLab help you with the Cloudera certification and help you learn Big Data overall?
Senthil: CloudxLab played an important part in the hands on experience for my big data learning. As soon as I understood that my laptop may not be able to support all the tools necessary to work towards the certification, I started looking for a cloud based solution and found CloudxLab. The sign up was easy and everything was setup in a short time. I must say, without doing hands on it would have been harder to crack the certification. Thanks to CloudxLab for that.
CxL: Why CloudxLab and not a Virtual Machine?
Continue reading “Cloudera Certification Practice On CloudxLab”
CloudxLab Joins Hands With TechM’s UpX Academy
![]()
CloudxLab is proud to announce its partnership with TechMahindra’s UpX Academy. TechM’s e-learning platform, UpX Academy, delivers courses in Big Data & Data Sciences. With programs spanning over 6-12 weeks and covering in-demand skills such as Hadoop, Spark, Machine Learning, R and Tableau, UpX has tied up with CloudxLab to provide the latest to its course takers.
Run by an excellent team, we at CloudxLab are in awe of the attention UpX pays to the users needs. As Sandeep (CEO at CloudxLab) puts it, “We were not surprised when UpX decided to come on board. Their ultimate interest is in keeping their users happy and we are more than glad to work with them on this.”
Continue reading “CloudxLab Joins Hands With TechM’s UpX Academy”
Running PySpark in Jupyter / IPython notebook
You can run PySpark code in Jupyter notebook on CloudxLab. The following instructions cover 2.2, 2.3, 2.4 and 3.1 versions of Apache Spark.
What is Jupyter notebook?
The IPython Notebook is now known as the Jupyter Notebook. It is an interactive computational environment, in which you can combine code execution, rich text, mathematics, plots and rich media. For more details on the Jupyter Notebook, please see the Jupyter website.
Please follow below steps to access the Jupyter notebook on CloudxLab
To start python notebook, Click on “Jupyter” button under My Lab and then click on “New -> Python 3”
This code to initialize is also available in GitHub Repository here.
For accessing Spark, you have to set several environment variables and system paths. You can do that either manually or you can use a package that does all this work for you. For the latter, findspark is a suitable choice. It wraps up all these tasks in just two lines of code:
import findspark
findspark.init('/usr/spark2.4.3')
Here, we have used spark version 2.4.3. You can specify any other version too whichever you want to use. You can check the available spark versions using the following command-
!ls /usr/spark*If you choose to do the setup manually instead of using the package, then you can access different versions of Spark by following the steps below:
If you want to access Spark 2.2, use below code:
import os
import sys

os.environ["SPARK_HOME"] = "/usr/hdp/current/spark2-client"
os.environ["PYLIB"] = os.environ["SPARK_HOME"] + "/python/lib"
# In below two lines, use /usr/bin/python2.7 if you want to use Python 2
os.environ["PYSPARK_PYTHON"] = "/usr/local/anaconda/bin/python"
os.environ["PYSPARK_DRIVER_PYTHON"] = "/usr/local/anaconda/bin/python"
sys.path.insert(0, os.environ["PYLIB"] +"/py4j-0.10.4-src.zip")
sys.path.insert(0, os.environ["PYLIB"] +"/pyspark.zip")
If you plan to use 2.3 version, please use below code to initialize
import os
import sys

os.environ["SPARK_HOME"] = "/usr/spark2.3/"
os.environ["PYLIB"] = os.environ["SPARK_HOME"] + "/python/lib"
# In below two lines, use /usr/bin/python2.7 if you want to use Python 2
os.environ["PYSPARK_PYTHON"] = "/usr/local/anaconda/bin/python"
os.environ["PYSPARK_DRIVER_PYTHON"] = "/usr/local/anaconda/bin/python"
sys.path.insert(0, os.environ["PYLIB"] +"/py4j-0.10.7-src.zip")
sys.path.insert(0, os.environ["PYLIB"] +"/pyspark.zip")
If you plan to use 2.4 version, please use below code to initialize
import os
import sys

os.environ["SPARK_HOME"] = "/usr/spark2.4.3"
os.environ["PYLIB"] = os.environ["SPARK_HOME"] + "/python/lib"
# In below two lines, use /usr/bin/python2.7 if you want to use Python 2
os.environ["PYSPARK_PYTHON"] = "/usr/local/anaconda/bin/python"
os.environ["PYSPARK_DRIVER_PYTHON"] = "/usr/local/anaconda/bin/python"
sys.path.insert(0, os.environ["PYLIB"] +"/py4j-0.10.7-src.zip")
sys.path.insert(0, os.environ["PYLIB"] +"/pyspark.zip")
Now, initialize the entry points of Spark: SparkContext and SparkConf (Old Style)
from pyspark import SparkContext, SparkConf
conf = SparkConf().setAppName("appName")
sc = SparkContext(conf=conf)
Once you are successful in initializing the sc and conf, please use the below code to test
rdd = sc.textFile("/data/mr/wordcount/input/")
print(rdd.take(10))
print(sc.version)
You can initialize spark in spark2 (or dataframe) way as follows:
# Entrypoint 2.x
from pyspark.sql import SparkSession
spark = SparkSession.builder.appName("Spark SQL basic example").enableHiveSupport().getOrCreate()
sc = spark.sparkContext

# Now you even use hive
# Here we are querying the hive table student located in ab
spark.sql("select * from ab.student").show()

# it display something like this:
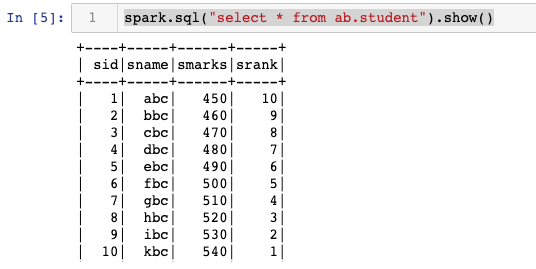
You can also initialize Spark 3.1 version, using the below code
import findspark
findspark.init('/usr/spark-3.1.2')Using TensorFlow on CloudxLab
We are glad to inform you that the TensorFlow is now available on CloudxLab. In this example, we will walk you through a basic tutorial on how to use TensorFlow.
What is TensorFlow?
TensorFlow is an Open Source Software Library for Machine Intelligence. It is developed and supported by Google and is being adopted very fast.
What is CloudxLab?
CloudxLab provides a real cloud-based environment for practicing and learn various tools. You can start learning right away by just signing up online.
Access S3 Files in Spark
In this blog post we will learn how to access S3 Files using Spark on CloudxLab.
Please follow below steps to access S3 files:
#Login to Web Console

#Specify the hadoop config
export YARN_CONF_DIR=/etc/hadoop/conf/
export HADOOP_CONF_DIR=/etc/hadoop/conf/

#Specify the Spark Class Path
export SPARK_CLASSPATH="$SPARK_CLASSPATH:/usr/hdp/current/hadoop-client/hadoop-aws.jar"
export SPARK_CLASSPATH="$SPARK_CLASSPATH:/usr/hdp/current/hadoop-client/lib/aws-java-sdk-1.7.4.jar"
export SPARK_CLASSPATH="$SPARK_CLASSPATH:/usr/hdp/current/hadoop-client/lib/guava-11.0.2.jar"

#Launch Spark Shell
/usr/spark1.6/bin/spark-shell

#On the spark shell Specify the AWS Key
sc.hadoopConfiguration.set("fs.s3n.awsAccessKeyId", "YOUR_AWS_ACCESS_KeY")
sc.hadoopConfiguration.set("fs.s3n.awsSecretAccessKey", "YOUR_AWS_SECRET_ACCESS_KeY")

#Now Access s3 files using spark
#Create RDD out of s3 file
val nationalNames = sc.textFile("s3n://cxl-spark-test-data/sss/baby-names.csv")

#Just check the first line
nationalNames.take(1)
INSOFE Ties Up With CloudxLab
![]()
Adding to an already impressive list of collaborations, International School of Engineering (INSOFE) has recently signed up with CloudxLab (CxL). This move will enable INSOFE’s students to practice in a real world scenario through the cloud based labs offered by CloudxLab.
INSOFE’s flagship program, CPEE – Certificate Program in Engineering Excellence – was created to transform “individuals into analytics professionals”. It is listed at #3 between Columbia and Stanford at #2 and #4 respectively, and holds the distinction of being the only institute outside the US to hold a spot in this list by CIO.com. This within an admirable 3 years of inception. Having established itself as one of the top institutes globally, INSOFE is ceaselessly on the look out for innovative ways to engage and enhance student experience.
SCMHRD Partners With CloudxLab
![]()
In a recent strategic partnership that demonstrates SCMHRD’s superior vision in pedagogy, the Post Graduate Program in Business Analytics (PGPBA) has tied up with well known learning innovation firm CloudxLab. With this partnership, SCMHRD’s students will get to learn and work with Big Data and analytics tools in the same manner that enterprises learn and use them.
SCMHRD’s flagship Analytics program PGPBA with its emphasis on Big Data analytics, as opposed to standard analytics, makes it relevant to a bigger gamut of employers and hence the better choice. This emphasis isn’t easy to cater to. Providing Big Data tools to learners entails providing a cluster (a bunch of computers) that they can practice on which in turn translates to expensive infrastructure, big support teams, and the operational costs that go with everything.
Access Spark 1.6 and Spark 2.3 on CloudxLab
To access Spark 2.3, type below commands in the web console
- pyspark (For Python)
- spark-shell (For Scala)
To access Spark 1.6, first set the version in the web console
export SPARK_MAJOR_VERSION=1
And then type below commands in the web console
- pyspark (For Python)
- spark-shell (For Scala)